One of the best resources for emergency preparedness is fresh meat you can hunt yourself. With a plentiful deer population in many regions, deer meat might be the most accessible source for sustaining your family. Learning to process deer meat is straightforward if you have the right tools and a basic understanding of butchering techniques.
By Preparedness Expert
After skinning, gutting, and cooling the deer, you’re ready to begin butchering. Use a gambrel to hang the deer by its hind legs, which helps separate the legs for easier handling. A small, sharp knife is ideal for precise cuts without damaging the bone or yourself. Removing connective tissue will improve the meat’s flavor, reducing any gamey taste.
Key Steps for Processing Deer Meat
Materials Needed
- Small sharp knife
- Gambrel
Butchering Steps
- Hang the deer by the hind legs using a gambrel after skinning and gutting.
- Carefully fillet the meat from the bone, avoiding bone cuts to keep your knife sharp.
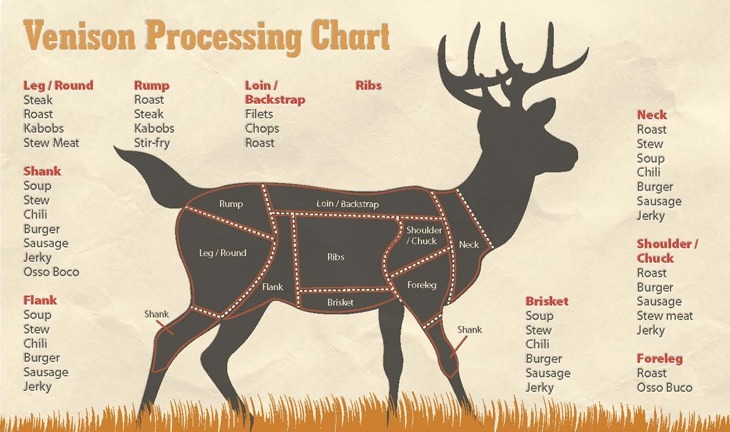
- Cut a ball roast by making a cut at the knee and following along the bone.
- Remove connective tissue, following the muscle lines to create a rump roast.
- Separate the rump roast from the femur, taking care to remove all connective tissue.
- Fillet the meat from the hip bone for a tender cut known as the hidden tenderloin.
- Remove large white lymph nodes, as these can contain bacteria and affect flavor.
- Follow muscle lines along the femur, working down to the pelvic bone for ground meat.
- Cut along the spine to separate the loin (backstrap) from ham muscles to the neck.
- Peel the loin from the ribs, filleting as you go.
- Remove any lymph nodes for the best quality meat.
- Take out the tenderloin, then separate the shoulder, which should fall away easily.
- Trim remaining meat from the bones for stew or soup.
How to Gut a Deer
Materials Needed
- 4-inch knife with handle guard
- Gut hook
- Gloves or disinfectant wipes
- Butt-out tool
Steps
- Lay the deer on an incline with the head downhill for proper drainage.
- Make a shallow cut along the belly from the pelvis, avoiding the intestines.
- Use a gut hook and pull the skin upward as you cut.
- Take care not to puncture the stomach. Clean any leakage with water.
- Remove the genitals and cut through the rib cage.
- Cut the diaphragm to access the heart and lungs, removing the esophagus.
- Remove the guts, using a butt-out tool to pull and dispose of the rectum.
- Cut through the pelvis and clear any remaining matter.
- Prop the carcass open to cool.
How to Skin a Deer
Skin the deer within two hours after the kill while it’s still warm for easier skinning.
Steps
- Hang the deer by its back legs or antlers.
- Make a cut around the neck if you wish to mount the head.
- Cut along the belly and down each leg.
- Peel the skin away from the meat, cutting carefully to keep the meat clean.
- Keep hair away from the meat for sanitation.


